Just wanted to update since it's been nearly a month. My family spent the better part of December coughing and blowing noses. I had the flu, followed immediately by the cough from hell that quickly turned to bronchitis. The boys all had a cough but fortunately no flu. We are now dealing with pink eye/conjunctivitis making the rounds through the house. My husband seems to be the toughest of all of us. He had neither the cough or the pink eye...yet.
I'm looking forward to what 2009 will bring. My husband is taking a much needed trip to Japan at the end of this month. Kapila will start middle school (!!!) in August...fortunately he won't be changing school as his school is K-8. Narada Muni will start kindergarten, which is very bittersweet for me. Rasaraj will make the jump to hyperspeed and finally go into 2nd grade :) As for me, I'm still thinking about what to do with myself...
Here's some
sekihan to celebrate the new year-YUM!~

Chokers or Belts
I first came up with this technique making belts for my Radha Govindaji. One day I was dressing them I tried one of the belts as a choker and it looked great, so I recently made some more specifically designed as chokers. This design is for chokers for my Jagannatha and Baladeva, but the technique is so versatile it would make excellent belts or could be modified slightly to make chokers for smaller deities.  Supplies:
1. Sewing Thread (I find polyester thread works best)
2. Extra Fine Beading Needles
3. Cord (I used heavy cotton string from my garland making kit, but you can also use embroidery floss in a matching colour)
4-6. Beads: For this design I used pearls, seed beads and glass bi-cones
7. Scissors

Step 1: Cut two lengths of the cord and tie 2-3 knots in the center of each length, thread each of the beading needles (make sure you have a generous amount of thread on each needle) and poke each needle through the knot in one piece of the cord and tie the ends of the thread securely together leaving a 2-3 inch tail (you will need this later).
Step 2: String 4-5 of the pearls through both of the needles. Then on each needle string a seed bead a pearl and another seed bead then another pearl through both needles. Repeat this pattern to the desired length, keep in mind that you want an even number of segments as you want an odd number of the hanging segments. In this case for five hanging segments there are six of these “base” segments.
Step 3: After you have completed the required number of base segments, string 4-5 of the pearls through both of the needles and poke each needle through the knot in the second piece of cord and tie the thread securely together.
Step 4: For this design there is only have one set of the hanging segments so one of the needles can be cut off at this point (if you wanted more hanging segments you would keep the second needle and just repeat the procedure for the hanging segments). Next, pass the remaining needle through the 4-5 pearls and the seed bead and pearl of the first base segment.
Step 5: To make the first hanging segment string on three seed beads and a glass bi-cone and another seed bead, then pass the needle back through the glass bi-cone and string on another three seed beads.
Step 6: Now pass the needle through the pearl of the next base segment, and continue with the base segments for the length of the necklace/belt. When you have completed your last hanging segment pas your needle through the 4-5 pearls at the end and securely tie off your thread using the tail you left earlier and trim off any excess thread.
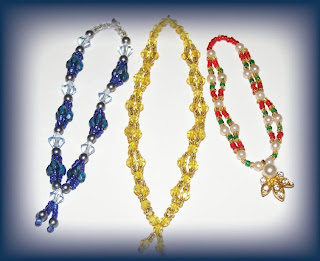
Here is some of the jewellery I’ve made using this technique.
Photo 1: Radharani’s orange choker was made by varying the length of the hanging segments and overlapping the second set of hanging segments.
Photo 2: Baladeva wearing the choker described in this post.
Photo 3: Govindaji’s belt is one of my favourite pieces made with this technique, here the hanging segments were done slightly different by weaving the needle through the base segments.
Chokers or Belts
I first came up with this technique making belts for my Radha Govindaji. One day I was dressing them I tried one of the belts as a choker and it looked great, so I recently made some more specifically designed as chokers. This design is for chokers for my Jagannatha and Baladeva, but the technique is so versatile it would make excellent belts or could be modified slightly to make chokers for smaller deities. Supplies:
1. Sewing Thread (I find polyester thread works best)
2. Extra Fine Beading Needles
3. Cord (I used heavy cotton string from my garland making kit, but you can also use embroidery floss in a matching colour)
4-6. Beads: For this design I used pearls, seed beads and glass bi-cones
7. Scissors
Step 1: Cut two lengths of the cord and tie 2-3 knots in the center of each length, thread each of the beading needles (make sure you have a generous amount of thread on each needle) and poke each needle through the knot in one piece of the cord and tie the ends of the thread securely together leaving a 2-3 inch tail (you will need this later).
Step 2: String 4-5 of the pearls through both of the needles. Then on each needle string a seed bead a pearl and another seed bead then another pearl through both needles. Repeat this pattern to the desired length, keep in mind that you want an even number of segments as you want an odd number of the hanging segments. In this case for five hanging segments there are six of these “base” segments.
Step 3: After you have completed the required number of base segments, string 4-5 of the pearls through both of the needles and poke each needle through the knot in the second piece of cord and tie the thread securely together.
Step 4: For this design there is only have one set of the hanging segments so one of the needles can be cut off at this point (if you wanted more hanging segments you would keep the second needle and just repeat the procedure for the hanging segments). Next, pass the remaining needle through the 4-5 pearls and the seed bead and pearl of the first base segment.
Step 5: To make the first hanging segment string on three seed beads and a glass bi-cone and another seed bead, then pass the needle back through the glass bi-cone and string on another three seed beads.
Step 6: Now pass the needle through the pearl of the next base segment, and continue with the base segments for the length of the necklace/belt. When you have completed your last hanging segment pas your needle through the 4-5 pearls at the end and securely tie off your thread using the tail you left earlier and trim off any excess thread.
Here is some of the jewellery I’ve made using this technique.
Photo 1: Radharani’s orange choker was made by varying the length of the hanging segments and overlapping the second set of hanging segments.
Photo 2: Baladeva wearing the choker described in this post.
Photo 3: Govindaji’s belt is one of my favourite pieces made with this technique, here the hanging segments were done slightly different by weaving the needle through the base segments.
Modern day academia is like an organized religion. It has its hierarchy, its dogmatic teachings, its rituals, its rites of passage, and its cosmology. It reacts to criticism from outside in the same way religious fanatics defend their faith -- with no consideration of logic or objectivity. It upholds its own values and, even though it abhors cultural relativity, it considers itself the sole guardian of truth. Actually, "truth" is not allowed. It has been banned. And so has "potential truth." Nothing has value. The greatest achievement that humanity can claim is a "valuableness" unto it's own particular culture or tradition. Thus nothing is of absolute value and, for the sake of "scholarship," everything is open to interpretation (speculation). What is left? A monistic, atheistic, undefinable mixed-up pile of human excreta that allows individuals the right to become mini-gods on the basis of how much well-articulated nonsense they can regurgitate in one sitting. This, my friends, is academia. This is the elite. This is what society looks up to as its teachers, mentors, and advisers. This is how the innocent are fooled. This is the battle.
All is not lost for as time waits for no man, and as Krsna is time,-- a change is underway.
Over the years I’ve tried a number of different options for storing my deities' jewellery and have found a system that works best for me. I've tried small plastic zip lock bags to store the jewelery sets that were then placed into larger zip lock bags with the matching outfit. However, the problem with this system is if you want to mix and match different jewellery you have to go searching through all the sets. As such, the system I currently use keeps all the jewellery easily on hand so it’s easy to find a specific item when you're dressing your deities.

The system basically uses storage boxes you can find at any craft store. I use one with large compartments (designed to hold spools of thread) to hold the larger crowns and mukut pieces. This container also has some larger compartments (I believe designed to hold sewing scissors) that come in handy for storing flutes and other accessories. I also use similar containers with smaller adjustable compartments to store the necklaces, bracelets, and smaller crowns. When selecting your storage container look for one that has a lid that closes tightly, this will help keep the jari (metallic thread) work on the crowns and mukut pieces form tarnishing over time. Additionally, I find the inside of the lid comes in handy for storing peacock feathers. I just use blutack to stick them to the inside of the lid so when I need them they're ready to use.

Even with this system I’ve found it difficult to keep track of the small bracelets. This can be a bit annoying when you're dressing and you can't find the other piece of a pair of bracelets. This is especially a problem with the elastic ones, with the bracelets that open and close the two pieces can be linked together to keep the pair from getting separated. To solve this problem I've recently begun storing the bracelets on safety pins to keep the matching pairs together.
Stay tuned I’ll be posting more techniques for necklaces in the coming weeks. A few readers have requested instructions for belts and turbans and I will be working on those as well. If you have any requests feel free to
email me
Over the years I’ve tried a number of different options for storing my deities' jewellery and have found a system that works best for me. I've tried small plastic zip lock bags to store the jewelery sets that were then placed into larger zip lock bags with the matching outfit. However, the problem with this system is if you want to mix and match different jewellery you have to go searching through all the sets. As such, the system I currently use keeps all the jewellery easily on hand so it’s easy to find a specific item when you're dressing your deities.
The system basically uses storage boxes you can find at any craft store. I use one with large compartments (designed to hold spools of thread) to hold the larger crowns and mukut pieces. This container also has some larger compartments (I believe designed to hold sewing scissors) that come in handy for storing flutes and other accessories. I also use similar containers with smaller adjustable compartments to store the necklaces, bracelets, and smaller crowns. When selecting your storage container look for one that has a lid that closes tightly, this will help keep the jari (metallic thread) work on the crowns and mukut pieces form tarnishing over time. Additionally, I find the inside of the lid comes in handy for storing peacock feathers. I just use blutack to stick them to the inside of the lid so when I need them they're ready to use.
Even with this system I’ve found it difficult to keep track of the small bracelets. This can be a bit annoying when you're dressing and you can't find the other piece of a pair of bracelets. This is especially a problem with the elastic ones, with the bracelets that open and close the two pieces can be linked together to keep the pair from getting separated. To solve this problem I've recently begun storing the bracelets on safety pins to keep the matching pairs together.
Stay tuned I’ll be posting more techniques for necklaces in the coming weeks. A few readers have requested instructions for belts and turbans and I will be working on those as well. If you have any requests feel free to
email me
It's been a long time. I was feeling uninspired, lazy, and...distracted:

You should all go read the Twilight series by Stephenie Meyer (no, i'm not being paid to say that). Who knew vampires could be so sexy? And who knew that a teen/young adult novel could be so engrossing? Move over Harry and make room for the Cullens.
It's been a long time. I was feeling uninspired, lazy, and...distracted:
You should all go read the Twilight series by Stephenie Meyer (no, i'm not being paid to say that). Who knew vampires could be so sexy? And who knew that a teen/young adult novel could be so engrossing? Move over Harry and make room for the Cullens.
<p>Visnumaya recently gave a talk at Gaura Yoga on cow protection, ecology and sustainability. She has posted the talk and the presentation slides on her website. Much recommended. Check it out:</p><p><a href="http://www.visnumaya.info/?p=124">"Holy Cow Protection" eco-talk at Gaura Yoga</a></p>
Visnumaya recently gave a talk at Gaura Yoga on cow protection, ecology and sustainability. She has posted the talk and the presentation slides on her website. Much recommended. Check it out:
"Holy Cow Protection" eco-talk at Gaura Yoga
Visnumaya recently gave a talk at Gaura Yoga on cow protection, ecology and sustainability. She has posted the talk and the presentation slides on her website. Much recommended. Check it out:
"Holy Cow Protection" eco-talk at Gaura Yoga

Some people have thought i have been dead-close to it no lie. An internal life of devotion is always a struggle. Winter hits me so hard. My pineal gland is covered by the grey shade of Ohio days and I receive no light. This absence of light brings depression. This lack of light tethered with the lack of intense engagement leaves me to myself-the thoughts of the mind and weakness of heart. Japa stretches throughout the day with little to no taste. What has brought encouragement and life is the blessed book New Seeds of Contemplation by Thomas Merton. Actually it has saved me. If you know me, that means alot. We have spent hours reading aloud in the house, on the subway, in the car, at the theatre and at restaurants. Everywhere it stands as inspiration to live and serve.
I am on the threshold of new. India is one week away. It will be a nice restart button.
The quote above is what is driving my purpose for ’09.

Multi-Stranded Necklaces
+of+blog3.jpg) These necklaces are easy to make and the technique can be modified to accommodate multiple strands, I have tried up to five strands simply add more needles. Additionally different beads can be used to create endless patterns.
These necklaces are easy to make and the technique can be modified to accommodate multiple strands, I have tried up to five strands simply add more needles. Additionally different beads can be used to create endless patterns.
+of+blog3.jpg) Supplies:
Supplies:
1. Scissors
2. Sewing Thread (I find polyester thread works best for this technique as nylon beading thread is too stiff for this style)
3. Big Beads
4. Seed Beads
5. Extra Fine Beading Needles
+of+blog3.jpg) Step 1: Cut two lengths of the sewing thread approximately 1m each, then String on one of he beading needles (the beading needles can be a bit difficult to thread, they often come with a ‘threader’ that makes the task a lot easier)onto each piece of thread. Next position the needle in the center of each thread. And tie all the ends together, resulting in two strands of double thread.
Step 1: Cut two lengths of the sewing thread approximately 1m each, then String on one of he beading needles (the beading needles can be a bit difficult to thread, they often come with a ‘threader’ that makes the task a lot easier)onto each piece of thread. Next position the needle in the center of each thread. And tie all the ends together, resulting in two strands of double thread.
Step 2: Now we begin beading. First string on a few of your larger beads passing each bead through both needles. To begin the pattern string on the large bead through both needles followed by your desired pattern on each needle. For my pattern this means passing the large bead through both needles and two seed beds one big bead and two more seed beads on each needle followed by passing another big bead through both needles.
 Step 3: Continue with the pattern until the desired length. In this case I had to modify the pattern a bit in the last link to create the length I required. Now you can make the pendant. For this string a big bead through both needles and then on each needle string two seed beads a big bed and another seed bead. Then pass you needles back through the pendant beads except the last seed bead (see step 3a above).
+of+blog3.jpg)
Step 4: Continue the pattern to make the second half of the necklace finishing off with the same number of big beads you began with and tie the two ends of the necklace together. Cut away the excess thread, optionally you can keep a little extra and use an incense stick to burn the ends of the tread to help keep your necklace together however be careful as if you burn too much your necklace will fall apart.

Here are some necklaces I made using this technique the pink and white one for my Govindaji was made using three needles and the green set for Chota Radha Gopinatha was made using four needles. Experiment with different strands and beads and you can create lots of different looks.
Multi-Stranded Necklaces
These necklaces are easy to make and the technique can be modified to accommodate multiple strands, I have tried up to five strands simply add more needles. Additionally different beads can be used to create endless patterns.
Supplies:
1. Scissors
2. Sewing Thread (I find polyester thread works best for this technique as nylon beading thread is too stiff for this style)
3. Big Beads
4. Seed Beads
5. Extra Fine Beading Needles
Step 1: Cut two lengths of the sewing thread approximately 1m each, then String on one of he beading needles (the beading needles can be a bit difficult to thread, they often come with a ‘threader’ that makes the task a lot easier)onto each piece of thread. Next position the needle in the center of each thread. And tie all the ends together, resulting in two strands of double thread.
Step 2: Now we begin beading. First string on a few of your larger beads passing each bead through both needles. To begin the pattern string on the large bead through both needles followed by your desired pattern on each needle. For my pattern this means passing the large bead through both needles and two seed beds one big bead and two more seed beads on each needle followed by passing another big bead through both needles.
Step 3: Continue with the pattern until the desired length. In this case I had to modify the pattern a bit in the last link to create the length I required. Now you can make the pendant. For this string a big bead through both needles and then on each needle string two seed beads a big bed and another seed bead. Then pass you needles back through the pendant beads except the last seed bead (see step 3a above).
Step 4: Continue the pattern to make the second half of the necklace finishing off with the same number of big beads you began with and tie the two ends of the necklace together. Cut away the excess thread, optionally you can keep a little extra and use an incense stick to burn the ends of the tread to help keep your necklace together however be careful as if you burn too much your necklace will fall apart.
Here are some necklaces I made using this technique the pink and white one for my Govindaji was made using three needles and the green set for Chota Radha Gopinatha was made using four needles. Experiment with different strands and beads and you can create lots of different looks.
<p>I have been taking some pictures in and around Gaura Haven / New Gupta Vraja, located in Otaki (about an hour's drive outside of Wellington). Here is a <a href="http://deltaflow.com/pictures/v/gaurahaven-landscapes/">gallery</a> the best photographs, the so-called "glory shots".</p><p>I'm relatively new to landscape photography. So, advice and suggestions are welcome.</p><p><a href="http://deltaflow.com/pictures/v/gaurahaven-landscapes/"><img src="http://www.deltaflow.com/wp-content/uploads/2008/11/gaurahaven-landscapes.jpg" width="300" height="210" alt="gaurahaven-landscapes.jpg"/></a></p><p>Additionally, I gave a photo presentation about Gaura Haven at our recent <a href="http://www.deltaflow.com/pictures/v/album_001/">Vyasa-Puja festival</a> in honor of Devamrita Swami. </p>
I have been taking some pictures in and around Gaura Haven / New Gupta Vraja, located in Otaki (about an hour's drive outside of Wellington). Here is a gallery the best photographs, the so-called "glory shots".
I'm relatively new to landscape photography. So, advice and suggestions are welcome.

Additionally, I gave a photo presentation about Gaura Haven at our recent Vyasa-Puja festival in honor of Devamrita Swami.
I have been taking some pictures in and around Gaura Haven / New Gupta Vraja, located in Otaki (about an hour's drive outside of Wellington). Here is a gallery the best photographs, the so-called "glory shots".
I'm relatively new to landscape photography. So, advice and suggestions are welcome.
Additionally, I gave a photo presentation about Gaura Haven at our recent Vyasa-Puja festival in honor of Devamrita Swami.
<p>Last month I went on an eco-retreat with a group of young interested persons who have been coming along to the Gaura Yoga center in Wellington New Zealand. We went to Gaura Haven (New Gupta Vraja), a retreat center recently acquired by Gaura Yoga. While there we proceeded to plant a variety of organic vegetables. The idea is to slowly move towards self-sufficiency.</p><p>Here some pictures from the weekend events:</p><p><a href="http://deltaflow.com/pictures/v/eco-retreat2008/"><img src="http://www.deltaflow.com/wp-content/uploads/2008/11/imgp0179.jpg" width="300" height="199" alt="IMGP0179.jpg"/></a></p>
Last month I went on an eco-retreat with a group of young interested persons who have been coming along to the Gaura Yoga center in Wellington New Zealand. We went to Gaura Haven (New Gupta Vraja), a retreat center recently acquired by Gaura Yoga. While there we proceeded to plant a variety of organic vegetables. The idea is to slowly move towards self-sufficiency.
Here some pictures from the weekend events:

I have a dilemma. I see posts on devotee websites and bulk emails full of slogans meant to change the hearts of their audiences. Devotees are connected with Krsna so anything posted by a devotee is in some way connected with the supreme. But slogans are so close to symbols, and symbols are fine for the masses, and though there's no harm in getting the masses off of their haunches in order to do something good for themselves and others, i cannot categorize devotees as part of the masses. The masses in this day and age are...... let me put it this way - not so Krsna conscious. Any small creeper of spiritual inquiry is immediately stamped out by their desires to eat, sleep, mate and defend. That is why slogans and symbols (even mode-of-goodness ones) are good for them - they need something catchy to clear the material mist once in a while. But it's rare souls, like devotees, who begin to inquiry further. And to throw slogans at these souls is, for want of a better word, sad. My dilemma is that i want to say something about how inquiry means so much more than symbolism and sloganism, but i can't for the slogans that devotees pass on are, in a certain capacity, correct - and they do attract attention.
I guess i did say something. By the way, did the images above inspire you to read this?
<p>On the weekend of the 25th of October, 2008 the majority of practitioners of Krishna consciousness in New Zealand (and a few from Australia) went to a retreat center in Inglewood, NZ called <a href="http://verticalhorizon.co.nz/">Vertical Horizon</a>. There we celebrated the Vyasa-Puja (birthday of the spiritual master) of Devamrita Swami.</p><p>It was a grand festivals. Nearly 100 devotees were present. It was expertly organized by Visnumaya and Gopal Guru. So many great activities, presentations and speeches. The spiritual food (prasadam) was over-the-top great. I also really enjoyed seeing and speaking with many, many old friends.</p><p>I took over 800 photos. You can view a selection of the best shots <a href="http://deltaflow.com/pictures/v/album_001/">here</a>:</p><p><a href="http://deltaflow.com/pictures/v/album_001/"><img src="http://www.deltaflow.com/wp-content/uploads/2008/11/album-001.jpg" width="300" height="200" alt="album_001.jpg"/></a> <a href="http://deltaflow.com/pictures/v/album_001/"/></p><p>(the images 0.8-megapixel images in the gallery are fine for viewing on screen, but not nearly detailed enough for large prints. If anyone wants to print out any of the images, please email me and I can supply the original full 14.6 megapixel images from the <a href="http://www.dpreview.com/reviews/pentaxk20d/">Pentax K20d</a>)</p>
On the weekend of the 25th of October, 2008 the majority of practitioners of Krishna consciousness in New Zealand (and a few from Australia) went to a retreat center in Inglewood, NZ called Vertical Horizon. There we celebrated the Vyasa-Puja (birthday of the spiritual master) of Devamrita Swami.
It was a grand festivals. Nearly 100 devotees were present. It was expertly organized by Visnumaya and Gopal Guru. So many great activities, presentations and speeches. The spiritual food (prasadam) was over-the-top great. I also really enjoyed seeing and speaking with many, many old friends.
I took over 800 photos. You can view a selection of the best shots here:

(the images 0.8-megapixel images in the gallery are fine for viewing on screen, but not nearly detailed enough for large prints. If anyone wants to print out any of the images, please email me and I can supply the original full 14.6 megapixel images from the Pentax K20d)
On the weekend of the 25th of October, 2008 the majority of practitioners of Krishna consciousness in New Zealand (and a few from Australia) went to a retreat center in Inglewood, NZ called Vertical Horizon. There we celebrated the Vyasa-Puja (birthday of the spiritual master) of Devamrita Swami.
It was a grand festivals. Nearly 100 devotees were present. It was expertly organized by Visnumaya and Gopal Guru. So many great activities, presentations and speeches. The spiritual food (prasadam) was over-the-top great. I also really enjoyed seeing and speaking with many, many old friends.
I took over 800 photos. You can view a selection of the best shots here:
(the images 0.8-megapixel images in the gallery are fine for viewing on screen, but not nearly detailed enough for large prints. If anyone wants to print out any of the images, please email me and I can supply the original full 14.6 megapixel images from the Pentax K20d)

Shri Govinda joins Giriraja on Govardhan Hill at the Govardhan Puja Celebrations held tonight at ISKCON Toronto, more pictures here:
Shri Govinda joins Giriraja on Govardhan Hill at the Govardhan Puja Celebrations held tonight at ISKCON Toronto, more pictures here:

Thier Lordships in thier new outfit for Diwali and Govardhan Puja with the altar decorated with sweets and lamps to welcome Lord Rama home, more pictures in the slideshow below:
Sri Sri Radha Ksira-Chora Gopinatha's special Night Darshan for Diwali

Thier Lordships in thier new outfit for Diwali and Govardhan Puja with the altar decorated with sweets and lamps to welcome Lord Rama home, more pictures in the slideshow below:
Sri Sri Radha Ksira-Chora Gopinatha's special Night Darshan for Diwali

His Holiness Jayapataka Swami, a very prominent leader in ISKCON, is in serious condition after suffering from brain hemorrhaging last night/early morning in India. He is very dear to Krishna and the devotees all over the world. Please, if you are inclined to pray then say a prayer for his recovery. I can't bear to think of how devastating it would be to lose him. My family is quite fond of him, though we have only met him few times-once even in Japan!
Here is a link with information about his condition and updates:
This is the prayer we sing to Lord Nrsimhadeva (lord Krishna in his half man/half lion incarnation) for the protection of His devotees:
namas te narasimhaya prahladahlada-dayine hiranyakashipor vaksaha shila-tanka-nakhalaye
I offer my obeisances to Lord Narasimha, who gives joy to Prahlada Maharaja and whose nails are like chisels on the stonelike chest of the demon Hiranyakasipu.
ito nrisimhah parato nrisimho yato yato yami tato nrisimhah bahir nrisimho hrdaye nrisimho nrisimham adim sharanam prapadye
Lord Nrsimha is here and also there. Wherever I go Lord Nrsimha is there. he is within the heart and is outside as well. I surrender to Lord Nrsimha, the origin of all things and the supreme refuge.
tava kara-kamala vare nakham adbhuta-shringam dalita-hiranyakashipu-tanu bhrigam keshava dhrita-narahari-rupa jaya jagadisha hare
O Kesava! O Lord of the universe! O Lord Hari, who have assumed the form of half-man, half-lion! All glories to you! Just as one can easily crush a wasp between one's fingernails, so in the same way the body of the wasplike demon Hiranyakasipu has been ripped apart by the wonderful pointed nails on your beautiful lotus hands.
Beaded Elastic Bracelets
+of+blogv3.jpg)
These bracelets are extremely versatile, they are my favourite for Jagannatha, Laddu Gopal and Gaura Nitai. These bracelets are so versatile I have made them for all my deities.

First of all, the supplies you require for these bracelets are as follows:
- Crimp Beads (these are optional, but they help make the bracelets stronger)
- Pliers
- Elastic Jewelry Cord
- Beads of your choice (using different colours and shapes can create different looking styles using this technique)
- Scissors

Step 1: Cut a generous length of the elastic jewelry cord and tie a knot at the end. Next string on the crimp bead followed by the beads.
Step 2: Feed the unknotted end of the jewelry cord back through the crimp bead (in the opposite direction) to complete the bracelet.
Step 3: Use the pliers to 'crush' the crimp bead securing the bracelet. Alternatively, you can eliminate the crimp bead and just knot the cord however due to the stress put on the bracelet when stretched over the deity's hands the crimp beads tend to hold up better over the long run. However, for Jagganatha and Laddu Gopal I find knotting works best as the bracelets can be visible from all sides and they do not need to be stretched as much. Finally, trim off the excess jewelry cord.
The finished product, I've found using different shapes and colours and sizes of beads works well with this technique. Also For my Gaura Nitai I like to use two bracelets with different sized beads.
Beaded Elastic Bracelets
These bracelets are extremely versatile, they are my favourite for Jagannatha, Laddu Gopal and Gaura Nitai. These bracelets are so versatile I have made them for all my deities.
First of all, the supplies you require for these bracelets are as follows:
- Crimp Beads (these are optional, but they help make the bracelets stronger)
- Pliers
- Elastic Jewelry Cord
- Beads of your choice (using different colours and shapes can create different looking styles using this technique)
- Scissors
Step 1: Cut a generous length of the elastic jewelry cord and tie a knot at the end. Next string on the crimp bead followed by the beads.
Step 2: Feed the unknotted end of the jewelry cord back through the crimp bead (in the opposite direction) to complete the bracelet.
Step 3: Use the pliers to 'crush' the crimp bead securing the bracelet. Alternatively, you can eliminate the crimp bead and just knot the cord however due to the stress put on the bracelet when stretched over the deity's hands the crimp beads tend to hold up better over the long run. However, for Jagganatha and Laddu Gopal I find knotting works best as the bracelets can be visible from all sides and they do not need to be stretched as much. Finally, trim off the excess jewelry cord.
The finished product, I've found using different shapes and colours and sizes of beads works well with this technique. Also For my Gaura Nitai I like to use two bracelets with different sized beads.
<p>In this talk at Gaura Yoga in Wellington, New Zealand I discuss a topic that has confounded many statesmen, philosophers and theologians. Why do bad things happen to good people and why do good things happen to bad people? I give an overview of different so-called answers that people try to give to this question. I then explain how the science of Krishna consciousness gives a much more satisfying and sensible answer than any other source of knowledge. There are lots of questions in the end.</p><p> </p><p><a href="http://www.deltaflow.com/wp-content/why%20bad%20things%20happen.m4a">Click here to play audio/video</a></p><p> </p><p>or download the source AAC file <a href="http://www.deltaflow.com/wp-content/why%20bad%20things%20happen.m4a">bad things.m4a</a></p><p>or download the source MP3 file <a href="http://www.deltaflow.com/wp-content/why%20bad%20things%20happen.mp3">bad things.mp3</a></p><p>or download the slides as a PDF file <a href="http://www.deltaflow.com/wp-content/why%20bad%20things%20happen.pdf">bad things.pdf</a></p>
In this talk at Gaura Yoga in Wellington, New Zealand I discuss a topic that has confounded many statesmen, philosophers and theologians. Why do bad things happen to good people and why do good things happen to bad people? I give an overview of different so-called answers that people try to give to this question. I then explain how the science of Krishna consciousness gives a much more satisfying and sensible answer than any other source of knowledge. There are lots of questions in the end.
Click here to play audio/video
or download the source AAC file bad things.m4a
or download the source MP3 file bad things.mp3
or download the slides as a PDF file bad things.pdf

namamisvaram sac-cid-ananda-rupam
lasat-kundalam gokule bhrajamanam
yasoda-bhiyolukalad-dhavamanam
paramrstam atyam tato drutya gopya
To the Supreme Lord, whose form is the embodiment of eternal existence,knowledge, and bliss, whose shark-shaped earrings are swinging to and fro, who is beautifully shining in the divine realm of Gokula, who I (due to the offense of breaking the pot of yogurt that His mother was churning into butter and then stealing the butter that was kept hanging from a swing) is quickly running from the wooden grinding mortar in fear of mother Yasoda, but who has been caught from behind by her who ran after Him with greater speed--to that Supreme Lord, Sri Damodara, I offer my humble obeisances.
Hello Everyone!
You are invited to attend our Kirtan Festival in Upstate NY. If you in the area or would like to fly in please register. October 24-26th.

Check out the list of activities and the link.
http://www.gauravani.com/
Essential Kirtan and Yoga Workshop
FRIDAY EVE: 6pm-8pm
Foundational Rhythms of Kirtan: Balaram Chandra
Stories within the Music; lila’s of Krishna and Rama: Raghunath
Kirtan and dance performance: prayers to the Butter Thief:
Gaura, Keli & Vrinda
SATURDAY:
7-8AM meditation, japa & pranayama w/ live sitar by Curtis Bahn: Balaram Chandra
8-9 AM breakfast prasad
9-930 Songs of the Sages:song study with Gaura and Raghunath
930-11AM BHAKTI VINYASA YOGA levels 2-4 with Raghunath
11-11:30AM break
11:30-12:45AM MANTRAS FROM THE VEDAS: their power and meaning by Raghunath
12:45-2:45pm Lunch Break
2:45-4:45pm Group Musical instrument Study (choose two)
Harmonium, Kartals, Indian Mrdanga (clay drum), Dance, Songs & Significance
4:45- 5:45 PM Restorative & Open mat Yoga with Live kirtan
5:45-8 PM Dinner Break
8-9:30 PM Karuna Shakti Evening Kirtan with Gaura Vani and As Kindred Spirits
SUNDAY:
7-8AM:mediation, japa & pranayama w/ live sitar by Curtis Bahn:Balarama Chandra
8-9 AM breakfast
9-10:30-MANTRAS & MOVEMENT :asana class with Keli Lalita
11AM-12:30 Experiments with Kirtan visualizations
12:30-1pm Final Dance and Kirtan with Gaura & Vrinda Rani
1pm-3pm Govardhana Picnic and Goodbyes


+of+blog3.jpg)
+of+blog3.jpg)
+of+blog3.jpg)

+of+blog3.jpg)


+of+blogv3.jpg)


